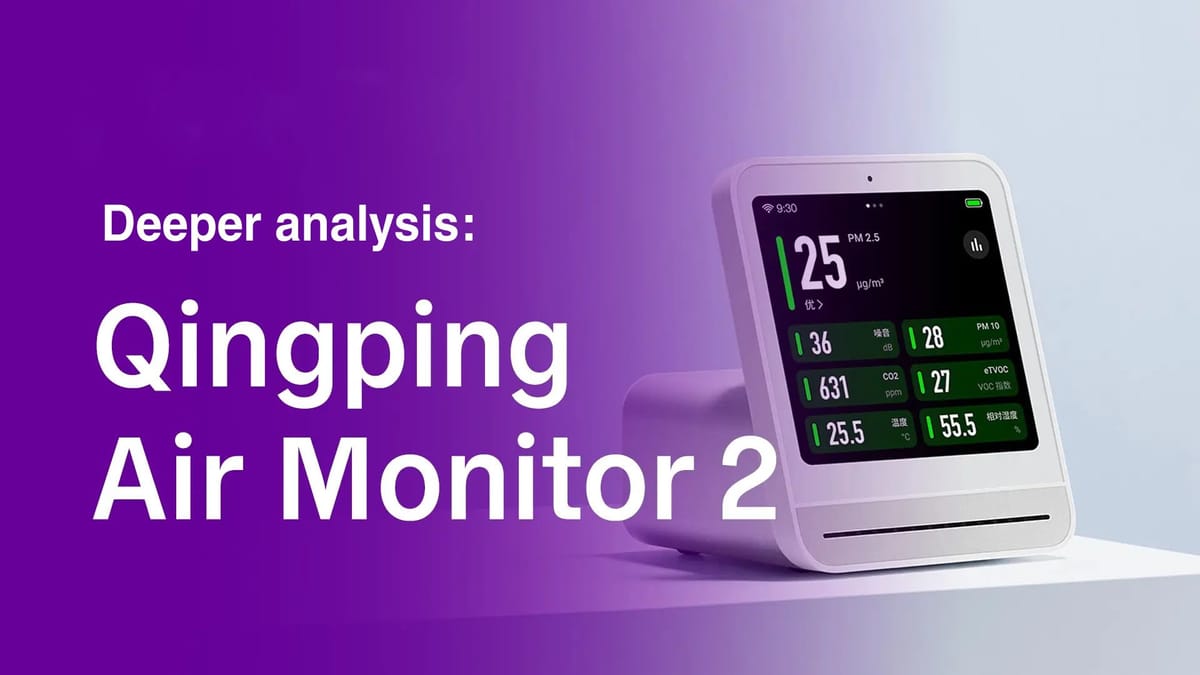
Qingping Air Monitor 2: A Deeper Dive
For the past few months, my work schedule shifted to hybrid, and since I’ve started spending more time working from home, I’ve begun to wonder about the quality of the air I’m breathing—especially in the new area I recently moved to.
I was already familiar with air quality (AQ) monitors from my time in the home automation business; some clients had even requested them to be integrated into their dashboards. But this time, I wanted to experience the metrics firsthand and visualize them for my own daily analysis.
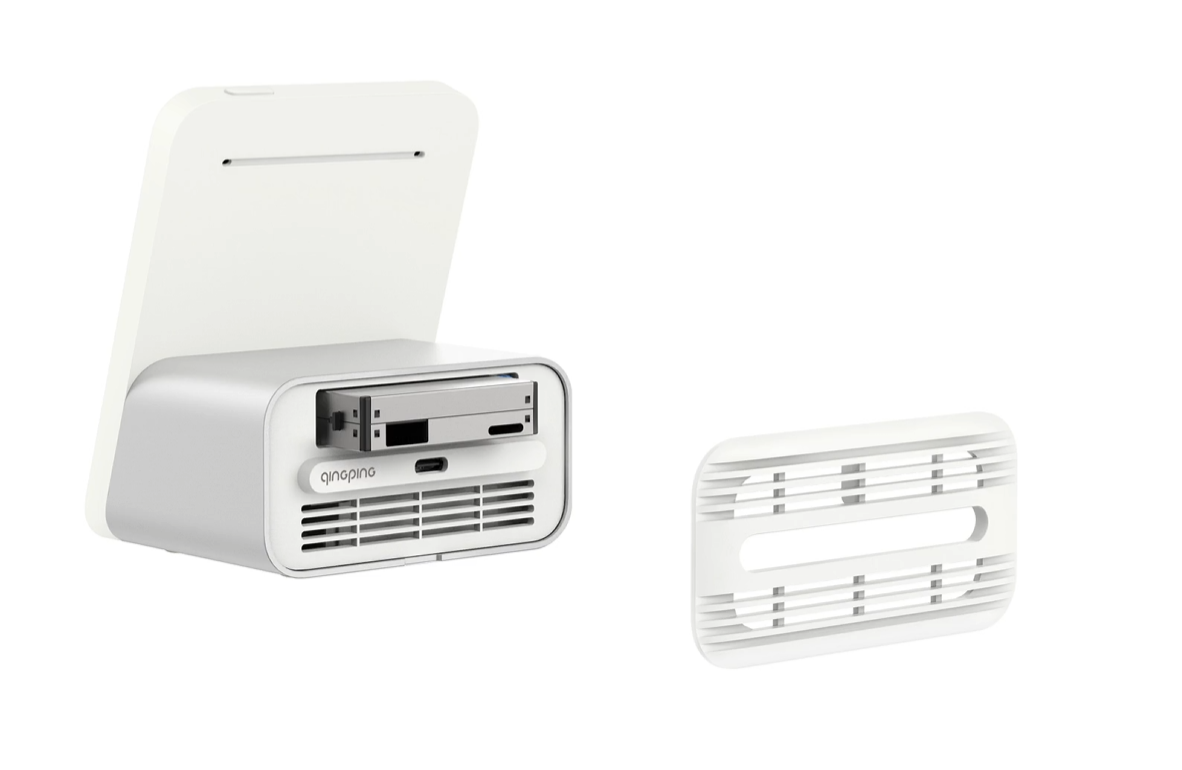
So, the best air quality (AQ) monitor on the market—at least in my opinion—is the Qingping Air Monitor. While checking out the product, I realized the new second-generation model (CGS2) had just been released. Compared to the original CGS1, it features a larger 4" screen and a clever upgrade: the PM sensor comes as a replaceable cartridge. That means you don’t have to throw away the entire device in a few years—just swap out the sensor cartridge for around $25. Sounds amazing!
The question I keep asking myself whenever I buy a smart home device is: Can I integrate it with Home Assistant? Does it offer a local API or local MQTT support—so I don’t have to rely on any external Chinese servers?
After a quick Google search, I was thrilled to discover that the Qingping Air Monitor 2 actually has official local MQTT integration. That’s a huge win!
After receiving the device and playing with the UI—which, by the way, is exceptionally well made— I was immediately impressed. No lag, scrolling is incredibly smooth, and it’s honestly one of the best embedded user interfaces I’ve ever seen. The display resolution and DPI are also perfectly balanced for the screen size… truly impressive.
That’s when the question popped into my head: What’s running under the hood? Is this just a well-crafted Linux application—or is it actually an Android app?
Gaining Root access
Curiosity got the better of me, and I started to investigate. After a while, I found a Developer Menu in the About section that enables root ADB access—a gift I definitely wasn’t expecting! Let’s dive in!
So, there are actually two options: “ADB Debugging” and “Enable Wi-Fi Debug Mode.”
The first works over a USB-C cable connected to your computer, while the second operates over Wi-Fi (on port 5555). Let’s go with the second option.

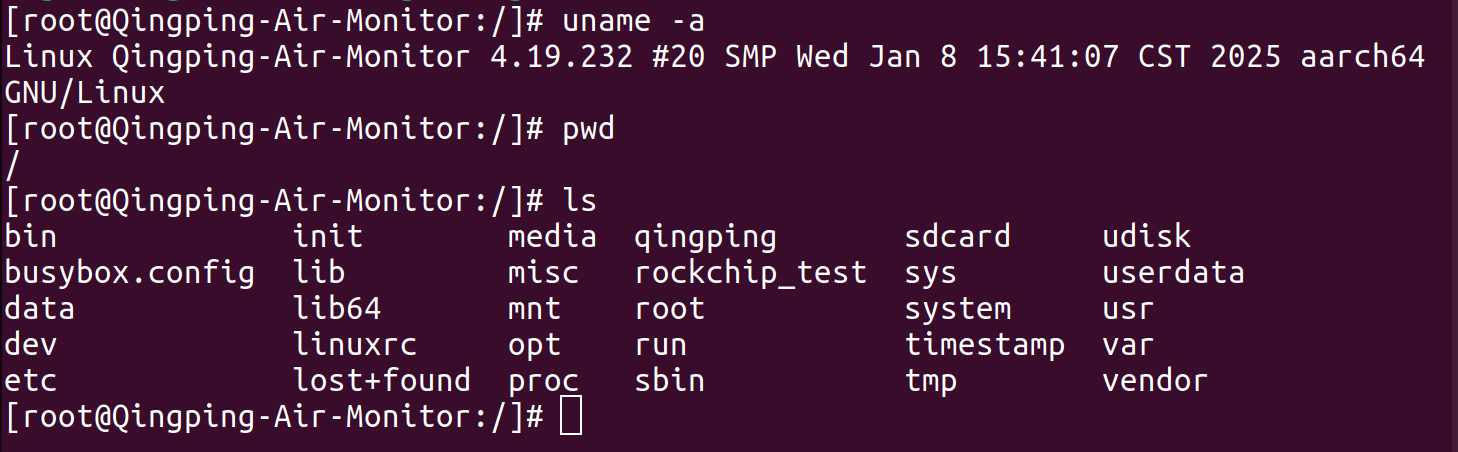
Just like that, we’re in the root shell!
With a few quick commands, we can see the device is running Buildroot Linux with kernel 4.19.232 on the Rockchip PX30 SoC (RK3326)
After analyzing the running processes, I found that the main application resides in /qingping/bin under the name QingSnow2App. It’s built using Qt and uses EGLFS as its graphics backend—bypassing Weston entirely.
The MQTT client, on the other hand, is located in a separate directory: /qingping/bin/miio. It consists of three binaries:
miio_clientmiio_recv_linemiio_send_line
All three appear to be compiled without symbols, likely to make reverse engineering a bit more challenging.
Backup
For now, let’s play it safe and dump the partitions in case i accidentally break something. That way, we’ll at least have the ability to restore the device later.
adb pull /dev/mmcblk2p1 ./uboot.img
adb pull /dev/mmcblk2p2 ./trust.img
adb pull /dev/mmcblk2p3 ./misc.img
adb pull /dev/mmcblk2p4 ./boot.img
adb pull /dev/mmcblk2p5 ./recovery.img
adb pull /dev/mmcblk2p6 ./backup.img
adb pull /dev/mmcblk2p7 ./oem.img
adb pull /dev/mmcblk2p8 ./rootfs.img
adb pull /dev/mmcblk2p9 ./userdata.img
I’ve saved the dump and intercepted OTA updates here in case anyone needs it.
Device tree inspection
As usual, let’s extract the Device Tree Source (DTS) from the kernel and inspect some of the peripherals.
Display
panel@0 {
			compatible = "sitronix,st7703\0simple-panel-dsi";
			reg = <0x00>;
			reset-gpios = <0x6c 0x06 0x00>;
			backlight = <0xa0>;
			power-supply = <0xa1>;
			prepare-delay-ms = <0x02>;
			reset-delay-ms = <0x14>;
			init-delay-ms = <0x78>;
			enable-delay-ms = <0x78>;
			disable-delay-ms = <0x32>;
			unprepare-delay-ms = <0x14>;
			width-mm = <0x48>;
			height-mm = <0x48>;
			dsi,flags = <0xa03>;
			dsi,format = <0x00>;
			dsi,lanes = <0x04>;
			panel-init-sequence = [39 00 04 b9 f1 12 83 39 00 06 b1 00 00 00 da 80 39 00 04 b2 3c 12 30 39 00 0b b3 10 10 28 28 03 ff 00 00 00 00 15 00 02 b4 80 39 00 03 b5 0a 0a 39 00 03 b6 97 97 39 00 05 b8 26 22 f0 63 39 00 1c ba 33 81 05 f9 0e 0e 20 00 00 00 00 00 00 00 44 25 00 90 0a 00 00 01 4f 01 00 00 37 15 00 02 bc 47 39 00 04 bf 02 11 00 39 00 0a c0 73 73 50 50 00 00 12 70 00 39 00 0d c1 43 00 32 32 77 c1 ff ff cc cc 77 77 39 00 07 c6 82 00 bf ff 00 ff 39 00 07 c7 b8 00 0a 00 00 00 39 00 05 c8 10 40 1e 02 15 00 02 cc 0b 39 00 23 e0 00 0b 10 2c 3d 3f 42 3a 07 0d 0f 13 15 13 14 0f 16 00 0b 10 2c 3d 3f 42 3a 07 0d 0f 13 15 13 14 0f 16 39 00 0f e3 07 07 0b 0b 0b 0b 00 00 00 00 ff 00 c0 10 39 00 40 e9 c8 10 0a 00 00 80 81 12 31 23 4f 86 a0 00 47 08 00 00 0c 00 00 00 00 00 0c 00 00 00 98 02 8b af 46 02 88 88 88 88 88 98 13 8b af 57 13 88 88 88 88 88 00 00 00 00 00 00 00 00 00 00 00 00 00 39 00 3e ea 97 0c 09 09 09 78 00 00 00 00 00 00 9f 31 8b a8 31 75 88 88 88 88 88 9f 20 8b a8 20 64 88 88 88 88 88 23 00 00 02 62 00 00 00 00 00 00 00 00 00 00 00 00 00 00 00 40 80 81 00 00 00 00 39 00 04 ef ff ff 01 05 fa 01 11 05 32 01 29];
			panel-exit-sequence = <0x5000128 0x5000110>;

			display-timings {
				native-mode = <0xa2>;

				timing0 {
					clock-frequency = <0x2bfa8e0>;
					hactive = <0x2d0>;
					vactive = <0x2d0>;
					hfront-porch = <0x6a>;
					hsync-len = <0x3c>;
					hback-porch = <0x78>;
					vfront-porch = <0x14>;
					vsync-len = <0x04>;
					vback-porch = <0x14>;
					hsync-active = <0x00>;
					vsync-active = <0x00>;
					de-active = <0x00>;
					pixelclk-active = <0x00>;
					phandle = <0xa2>;
				};
};- 720×720 resolution
- ~360 PPI
- MIPI DSI 4-lane interface
- 60 Hz refresh rate
- ST7703 driver
Connected I²C Sensors
i2c@ff190000 {
		compatible = "rockchip,rk3399-i2c";
		reg = <0x00 0xff190000 0x00 0x1000>;
		clocks = <0x02 0x1e 0x02 0x14f>;
		clock-names = "i2c\0pclk";
		interrupts = <0x00 0x08 0x04>;
		pinctrl-names = "default";
		pinctrl-0 = <0x68>;
		#address-cells = <0x01>;
		#size-cells = <0x00>;
		status = "okay";
		clock-frequency = <0x61a80>;
		i2c-scl-rising-time-ns = <0x113>;
		i2c-scl-falling-time-ns = <0x10>;
		phandle = <0x102>;

		sensor@f {
			status = "okay";
			compatible = "ak8963";
			reg = <0x0f>;
			type = <0x03>;
			irq_enable = <0x00>;
			poll_delay_ms = <0x1e>;
			layout = <0x01>;
			reprobe_en = <0x01>;
		};

		gt1x@14 {
			compatible = "goodix,gt1x";
			reg = <0x14>;
			power-supply = <0x2b>;
			goodix,rst-gpio = <0x5c 0x0c 0x00>;
			goodix,irq-gpio = <0x5c 0x05 0x08>;
			phandle = <0x103>;
		};

		sensor@4c {
			status = "disabled";
			compatible = "gs_mma7660";
			reg = <0x4c>;
			type = <0x02>;
			irq-gpio = <0x5c 0x0f 0x08>;
			irq_enable = <0x00>;
			poll_delay_ms = <0x1e>;
			layout = <0x02>;
			reprobe_en = <0x01>;
		};

		co2_sensor@62 {
			compatible = "co2_scd40";
			reg = <0x62>;
			interrupt-parent = <0x69>;
			#address-cells = <0x01>;
			#size-cells = <0x00>;
			phandle = <0x104>;
		};

		voc_sensor@59 {
			compatible = "voc_sgp40";
			reg = <0x59>;
			interrupt-parent = <0x69>;
			phandle = <0x105>;
		};

		temperature_sensor@44 {
			compatible = "temperature_shtv4";
			reg = <0x44>;
			interrupt-parent = <0x69>;
			phandle = <0x106>;
		};

		light_sensor@45 {
			compatible = "light_opt3004";
			reg = <0x45>;
			interrupt-parent = <0x69>;
			phandle = <0x107>;
		};

		pressure_sensor@77 {
			compatible = "pressure_tcbp001mb";
			reg = <0x77>;
			interrupt-parent = <0x69>;
			phandle = <0x108>;
		};
	};

	i2c@ff1a0000 {
		compatible = "rockchip,rk3399-i2c";
		reg = <0x00 0xff1a0000 0x00 0x1000>;
		clocks = <0x02 0x1f 0x02 0x150>;
		clock-names = "i2c\0pclk";
		interrupts = <0x00 0x09 0x04>;
		pinctrl-names = "default";
		pinctrl-0 = <0x6a>;
		#address-cells = <0x01>;
		#size-cells = <0x00>;
		status = "okay";
		clock-frequency = <0x61a80>;
		phandle = <0x109>;

		focaltech@38 {
			compatible = "focaltech,fts";
			power-supply = <0x6b>;
			reg = <0x38>;
			interrupt-parent = <0x6c>;
			interrupts = <0x00 0x04>;
			focaltech,reset-gpio = <0x6c 0x01 0x01>;
			focaltech,irq-gpio = <0x6c 0x00 0x08>;
			focaltech,max-touch-number = <0x05>;
			focaltech,display-coords = <0x2d0 0x00 0x00 0x2d0>;
			phandle = <0x10a>;
		};
	};

	i2c@ff1b0000 {
		compatible = "rockchip,rk3399-i2c";
		reg = <0x00 0xff1b0000 0x00 0x1000>;
		clocks = <0x02 0x20 0x02 0x151>;
		clock-names = "i2c\0pclk";
		interrupts = <0x00 0x0a 0x04>;
		pinctrl-names = "default";
		pinctrl-0 = <0x6d>;
		#address-cells = <0x01>;
		#size-cells = <0x00>;
		status = "okay";
		clock-frequency = <0x5dc0>;
		phandle = <0x10b>;

		pm9500@12 {
			compatible = "pm9500";
			reg = <0x12>;
			interrupt-parent = <0x6e>;
			phandle = <0x10c>;
		};
	};
- Goodix GT1x – Touchscreen controller –
0x14(not active) - SCD40 – CO₂ sensor –
0x62 - SGP40 – VOC sensor –
0x59 - SHTV4 – Temperature & humidity sensor –
0x44 - OPT3004 – Ambient light sensor –
0x45 - TCBP001MB – Barometric pressure sensor –
0x77 - PM9500 – Particulate matter (PM) sensor –
0x12 - FocalTech FTS – Touchscreen controller –
0x38(the one that is actually used)
There are other peripherals—such as a microphone, speaker, Wi-Fi, and Bluetooth—but nothing caught my attention. Notably, Bluetooth is disabled in the Device Tree, so anyone who wants to use it will first need to load the appropriate .ko kernel module from Buildroot.
wireless-bluetooth {
		compatible = "bluetooth-platdata";
		clocks = <0xd1 0x01>;
		clock-names = "ext_clock";
		uart_rts_gpios = <0x69 0x13 0x01>;
		pinctrl-names = "default\0rts_gpio";
		pinctrl-0 = <0xd2>;
		pinctrl-1 = <0xd3>;
		BT,reset_gpio = <0x5c 0x11 0x00>;
		BT,wake_gpio = <0x5c 0x01 0x00>;
		BT,wake_host_irq = <0x5c 0x0b 0x00>;
		status = "disabled";
	};
Conclusion
Without even opening the device, we were able to gain deep insights into the hardware, make full EMMC backup and obtain root shell access. In theory, we could go even further—run custom software for visualization or execute self-written code to extend its functionality. Not bad at all!
Thanks, everyone, for your attention!